The SNA
Student Naval Aviator
This is the first article on a 1/32nd scale T-45C project. Representative photos of the progress so far can be found in this gallery some of the associated computer aided design (CAD) work can be found here. My T-45 has been an off an on affair for a few years, including a stalled 1/48th scale effort that has been overcome by a commercial kit that makes the conversion moot. With the launch of this web site I have resurrected a few projects that offer some unique content. The T-45 project is a perfect start with a much neglected topic of modern naval aviator flight equipment. The following is a guide to modifying the best available injection molded pilot figures to a "modern" standard configuration. Though time marches on so let's say this is current is from "1999-2010" maybe a little further. In any event I always model what I see and there are plenty of projects out there that makes this article relevant for some time to come.
The Helmet and Mask
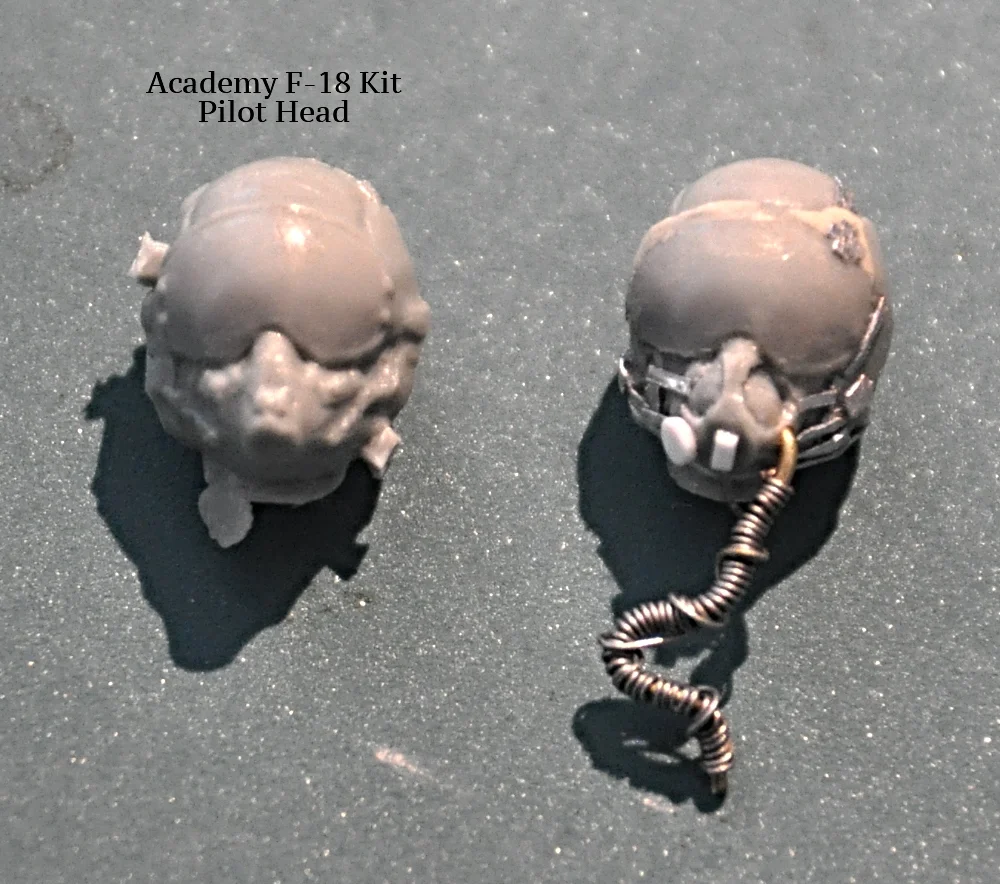


I started with the helmet and mask, I modeled an HGU68/P helmet and MBU-23/P mask from an injection molded pilot head acquired from an Academy F-18 kit. The HGU-68/P helmet had a 600 mph rating that meant the visor had a rail and locking mechanism installed. The HGU-68/P was a modification to a previous light weight version of the helmet with a bungeed visor. The kit head was a representation of a helmet with a bungeed visor so the modification to an HGU68/P locking visor was not too tough. I used two part epoxy putty (Apoxy Sculpt) to expand the outline of the visor; specifically where the hand screw locking mechanism was added on the top left of the visor. The visor hand screw, rails and mask bayonet retainers were fashioned from aluminum adhesive tape. I used the tape because its adhesive back helped initially hold the parts in place, until pieces were flooded with thin cyanoacrylate with excess quickly wicked away with a paper towel. On the real helmet a trapezoidal piece of leather, cary overs from previous helmet versions where a bungeed visor would potentially rub the helmet, are found on either side of the helmet adjacent to the visor. These leather sections were partially represented in the kit part and I further defined them by careful carving their outlines into the plastic. A couple of 0.005" discs cut with a Waldron Sub-Miniature punch and die set were placed at the back of the helmet to represent the attachment point of the helmet liner.
The mask required fewer but harder modifications. The MBU-23/P mask has a hard plastic frame with a soft gray rubber inner section that seals to the face of the aviator. Using a scalpel with an a miniature angled chisel blade I carved out the "plastic frame" from the plastic mask. The front of the mask was filed down to more accurately resemble the blunt shape of the MBU-23. A small disc of plastic was added to the right side of the mask along with a small rectangular piece on the front to represent the microphone amp. Small strips of sheet aluminum tape were added to represent the bayonets that connects the mask to the helmet and the straps that hold the mask to the bayonets. A scratch built oxygen hose was added. The hose was made from a length of brass wire wrapped with thin gauge beading wire that created the corrugated look of the prototype hose. Another strand of beading wire was loosely wrapped around the hose representing the communications wiring. The communications wire was terminated in a small plastic disc on the lower left side of the helmet.


The Body
Most of the work on the body was to get the figures hands in the right place. I was trying to create the illusion that our plastic Devil Dog was at the controls flying his jet. I chopped out the shoulders and wrists and used short lengths of wire fitted to holes drilled in the body parts to get the hands into the right place. Essentially I created a wire skeleton I could fairly easily pose. Once I had the hands in the right place the joints were filled and reshaped with epoxy putty. I also fashioned an epoxy putty thumb to complete the illusion he was actually holding onto the stick.
As for the details of there were only a few items that need to be added. The kit figure was wearing a generic survival vest and torso harness, frankly the detail was too obscure to definitively identify it. Knowing the canopy was to be closed, there was really no point in worrying too much about the details on the body anyway. The only detail I added was the flotation collar LPU-36/P made from epoxy putty. A couple of arm patches were added one low visibility U.S. flag on the left shoulder and a squadron T-45C patch on the right shoulder. The remaining detail work was defined with paint.

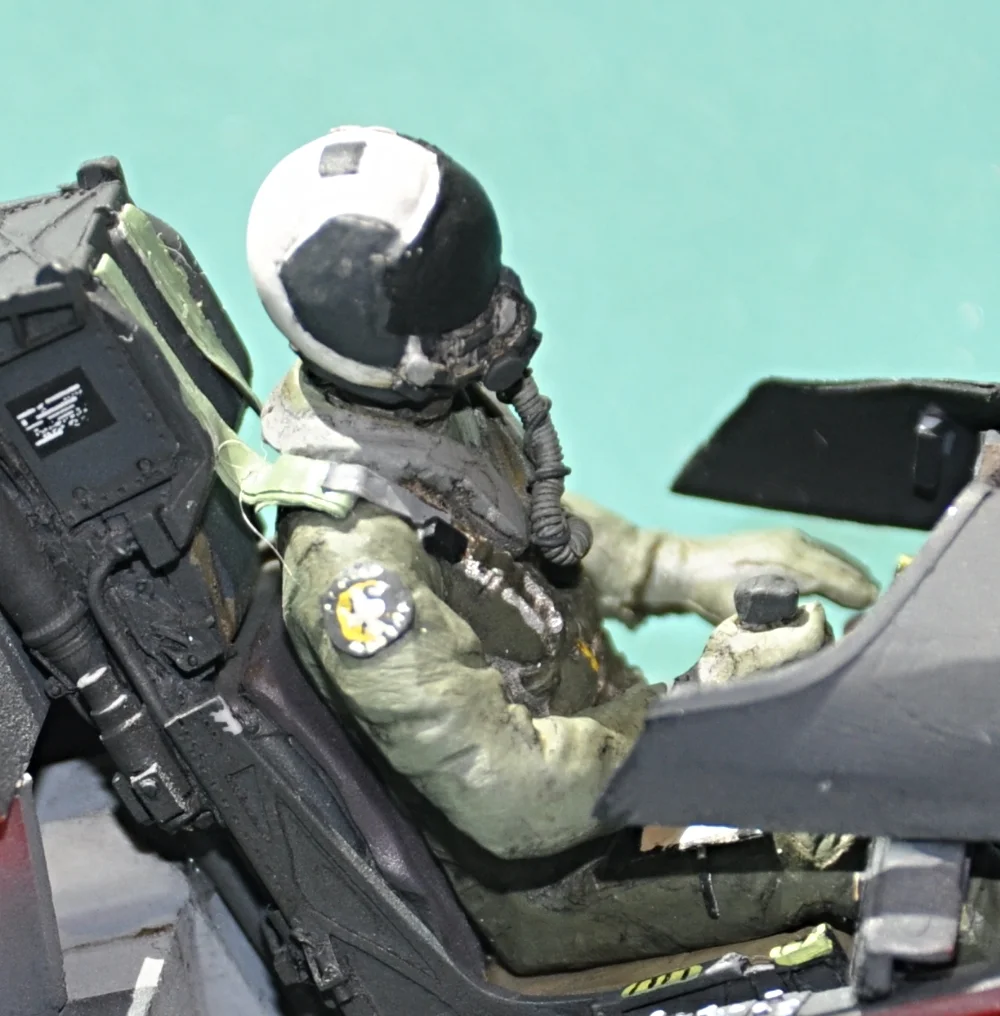

Paint work
The macro lens on the camera proved to be brutal foe! However, at a normal viewing distance our Stud pilot looked just right. The paint work started with two base airbrushed colors, white for the helmet and a green with a touch of brown for the survival vest, G-Suit and harness combination. The fight suit, gloves, horse collar and every other detail was painted by hand. I also made sure I varied the tones of my colors so details would subtlety stand out. For example there are at least three shades of "black". Once the pilot was in place, glued to his seat, a few strips of aluminum tape were placed on the seat and figure to simulate the harness connection and parachute risers. I used a black oil and japan dryer wash to add some tonal variation and accent detail. Finally, a coat of Testors Dullcote was sprayed overall and a couple of coats of Pledge Floor Finish (what used to be called Future Floor Wax) was applied to visor to add a smooth finish and get the gloss back. Oh, and he needed a kneeboard for all his "gouge" so that was added too. A simple aluminum tape rectangle painted black wth a piece of white decal for paper; with that I called him finished. With a caveat that I might touch him up a little if at some point he displeased me.
Notes:
I used custom mixed Tamiya Acrilc paints all XF designators or flat sheen. When spraying I used lacquer thinner, thinned at 1:1.5 to 1:1 paint to thinner ratio. For the hand painting I used plenty of thinner, Tamiya standard thinner, cleaned the brush often and maintained a wet edge as much as possible.
Recently I have discovered the power of magnification so the entirety of construction and painting was accomplished with a 10x jewelers loupe. The parts are so small, even in 1/32nd scale, magnification was necessary for me. Though I used a wash on as part of finishing, in general I like details to provide a variation in color and texture, not painting effects. The loupe was the tool that allowed me to create so many small details and accurately paint them.
Up Next....
The Instructor....dun, dun, dun...
Written and performed by,
Timmy!
March 30, 2016